Step-by-Step Guide: Developing a Resume builder with OpenAI, Node.js & React

As a full-stack web developer and technical writer, I bring a unique combination of skills to every project I work on. With experience in both web development and technical writing, I can develop custom solutions that are not only high-performing and user-friendly but also well-documented and easy to maintain. I have expertise in a wide range of programming languages and technologies, including HTML, CSS, JavaScript, React, Node.js, Python, and SQL, as well as technical writing tools and techniques. I am committed to delivering projects on time and within budget while ensuring that the final product meets the unique needs of the client. Let's work together to create something amazing that meets your needs and exceeds your expectations.
Introduction
In the modern job market, creating an impactful resume is essential for attracting potential employers and securing employment opportunities. With the advancement of technology, developers now have the tools to revolutionize the resume-building process by incorporating artificial intelligence (AI) capabilities. This step-by-step guide will walk you through the development of a cutting-edge resume builder application using OpenAI, Node.js, and React.
The integration of OpenAI's natural language processing (NLP) capabilities will enable our application to generate compelling and personalized resumes based on user input. Leveraging the power of Node.js, we'll build a robust backend to handle data processing and API interactions, while React will facilitate the creation of a dynamic and intuitive user interface.
By the end of this guide, you'll have a comprehensive understanding of how to harness the synergy between AI, backend development, and frontend design to create a sophisticated resume builder that empowers users to craft professional resumes tailored to their unique skills and experiences.
Project setup
I'll walk you through setting up the web application's project environment in this section. For the frontend, we'll use React.js, and for the backend server, Node.js.
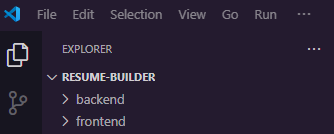
Create a project folder on the desktop and name it resume-builder. Drag-drop the folder you've just created on your favourite code editor to open it, in this code, I'm using VS code
Next, create two folders frontend and backend.
Navigate into the backend folder using the following command:
cd backend
While in the backend directory, run the following command to create a package.json file:
npm init -y
// package.json
{
  "name": "backend",
  "version": "1.0.0",
  "description": "",
  "main": "index.js",
  "scripts": {
    "test": "echo \"Error: no test specified\" && exit 1",
    "start": "nodemon index.js"
  },
  "keywords": [],
  "author": "",
  "license": "ISC",
  "dependencies": {
    "cors": "^2.8.5",
    "express": "^4.18.3",
    "multer": "^1.4.5-lts.1",
    "nodemon": "^3.1.0",
    "openai": "^4.29.2"
  },
  "type": "module"
}
Run the following to install the required dependencies:
npm install express cors nodemon
ExpressJSis a fast, minimalist framework that provides several features for building web applications in Node.js, CORSis a Node.js package that allows communication between different domains, and Nodemonis a Node.js tool that automatically restarts the server after detecting file changes.
On the backend folder, make an index.js file, which serves as the web server's entry point and copy-paste the code below:
//👇🏻index.js
import express from "express";
import cors from "cors";
const app = express();
const PORT = 4000;

app.use(express.urlencoded({ extended: true }));
app.use(express.json());
app.use(cors());
app.get("/api", (req, res) => {
    res.json({
        message: "Hello world",
    });
});
app.listen(PORT, () => {
    console.log(`Server listening on ${PORT}`);
});
In the package.json file, add the following script to configure Nodemod so that it can restart the server every time the files are changed:
"scripts": {
    "test": "echo \"Error: no test specified\" && exit 1",
    "start": "nodemon index.js"
  },
To test if everything is working well, run the following command to start the server:
npm start
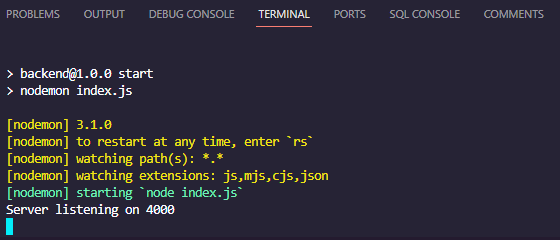
As you can see in the photo above, the server is running and listening at port 4000
Next, navigate into the frontend folder and run the following command to create a new react project
cd frontend
npx create-react-app ./
Run the following command to install Axios and React Router. React Router is a JavaScript package that allows you to navigate between pages in a React application. Axios is a promise-based Node.js HTTP client that handles asynchronous requests.
npm install axios react-router-dom
Update the App.js file with the following code:
function App() {
  return (
      <div>
          <p>Hello World!</p>
      </div>
  );
}
export default App;
In the index.css file post the following CSS code for styling:
@import url("https://fonts.googleapis.com/css2?family=Space+Grotesk:wght@300;400;500;600;700&display=swap");

* {
    font-family: "Space Grotesk", sans-serif;
    box-sizing: border-box;
    margin: 0;
    padding: 0;
}
form {
    padding: 10px;
    width: 80%;
    display: flex;
    flex-direction: column;
}
input {
    margin-bottom: 15px;
    padding: 10px 20px;
    border-radius: 3px;
    outline: none;
    border: 1px solid #ddd;
}
h3 {
    margin: 15px 0;
}
button {
    padding: 15px;
    cursor: pointer;
    outline: none;
    background-color: #28a745; /* Altered color to green */
    border: none;
    color: #f5f5f5;
    font-size: 16px;
    font-weight: bold;
    border-radius: 3px;
}
.app {
    min-height: 100vh;
    display: flex;
    flex-direction: column;
    align-items: center;
    justify-content: center;
    padding: 30px;
}
.app > p {
    margin-bottom: 30px;
}
.nestedContainer {
    display: flex;
    align-items: center;
    justify-content: space-between;
    width: 100%;
}
.companies {
    display: flex;
    flex-direction: column;
    width: 39%;
}
.currentInput {
    width: 95%;
}
#photo {
    width: 50%;
}
#addBtn {
    background-color: #007bff; /* Altered color to blue */
    margin-right: 5px;
}
#deleteBtn {
    background-color: #dc3545; /* Altered color to red */
}
.container {
    min-height: 100vh;
    padding: 30px;
}
.header {
    width: 80%;
    margin: 0 auto;
    min-height: 10vh;
    background-color: #f8f9fa; /* Altered color to light gray */
    padding: 30px;
    border-radius: 3px 3px 0 0;
    display: flex;
    align-items: center;
    justify-content: space-between;
}
.resumeTitle {
    opacity: 0.6;
}
.headerTitle {
    margin-bottom: 15px;
}
.resumeImage {
    vertical-align: middle;
    width: 150px;
    height: 150px;
    border-radius: 50%;
}
.resumeBody {
    width: 80%;
    margin: 0 auto;
    padding: 30px;
    min-height: 80vh;
    border: 1px solid #ced4da; /* Altered color to light gray */
}
.resumeBodyTitle {
    margin-bottom: 5px;
}
.resumeBodyContent {
    text-align: justify;
    margin-bottom: 30px;
}
Building applications components
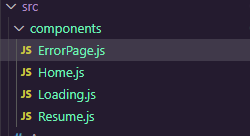
In the src folder, create a components folder and create the following files in it:
Home.js
Loading.js
Resume.js
ErrorPage.js
Let's start with the Loading page by copying the code below in the Loading.js file. It utilizes JSX syntax to create a div with the class name app and displays the message "Loading, please wait..." within an h1 element.
import React from "react";

const Loading = () => {
    return (
        <div className='app'>
            <h1>Loading, please wait...</h1>
        </div>
    );
};
export default Loading;
Error Page
Copy the code below into the ErrorPage.js file.
import React from "react";
import { Link } from "react-router-dom";

const ErrorPage = () => {
    return (
        <div className='app'>
            <h3>
                Oops! Something went wrong. Please return to the{" "}
                <Link to='/'>homepage</Link>.
            </h3>
        </div>
    );
};
export default ErrorPage;
Home page
In this Home.js file code, users can provide personal and professional information with this code, such as their full name, occupation, years of experience, technologies they use, and a headshot photo. The data entered into the form is logged to the console upon submission, and a loading indication is shown while processing. The component manages form inputs and loading state using React's useState hook. When the form is submitted, it presents a "Loading" component to show that the application is processing the data.
import React, { useState } from "react";
import { useNavigate } from "react-router-dom";
import Loading from "./Loading";
import axios from "axios";

const Home = ({ setResult }) => {
 const [fullName, setFullName] = useState("");
 const [email, setEmail] = useState("");
 const [phoneNumber, setPhoneNumber] = useState("");
 const [skills, setSkills] = useState("");
 const [educationHistory, setEducationHistory] = useState("");
 const [workExperience, setWorkExperience] = useState("");
 const [headshot, setHeadshot] = useState(null);
 const [loading, setLoading] = useState(false);
 const [companyInfo, setCompanyInfo] = useState([
  { name: "", position: "" },
 ]);
 const navigate = useNavigate();

 const handleFormSubmit = (e) => {
  e.preventDefault();
  const formData = new FormData();
  formData.append("headshot", headshot, headshot.name);
  formData.append("fullName", fullName);
  formData.append("educationHistory", educationHistory);
  formData.append("workExperience", workExperience);
  formData.append("companyInfo", companyInfo);
  formData.append("workHistory", JSON.stringify(companyInfo));
  axios
   .post("http://localhost:4000/resume/create", formData, {})
   .then((res) => {
    if (res.data.message) {
     //👇🏻 updates the result object
     setResult(res.data.data);
     navigate("/resume");
    }
   })
   .catch((err) => console.error(err));
  setLoading(true);
 };

 // Renders the Loading component when you submit the form
 if (loading) {
  return <Loading />;
 }
 // updates the state with user's input
 const handleAddCompany = () =>
  setCompanyInfo([...companyInfo, { name: "", position: "" }]);

 //removes a selected item from the list
 const handleRemoveCompany = (index) => {
  const list = [...companyInfo];
  list.splice(index, 1);
  setCompanyInfo(list);
 };
 // updates an item within the list
 const handleUpdateCompany = (e, index) => {
  const { name, value } = e.target;
  const list = [...companyInfo];
  list[index][name] = value;
  setCompanyInfo(list);
 };
 return (
  <div className="app">
   <h1>Resume Builder</h1>
   <p>Generate a resume with AI in few seconds</p>
   <form
    onSubmit={handleFormSubmit}
    method="POST"
    encType="multipart/form-data"
   >
    <label htmlFor="fullName">Full Name</label>
    <input
     type="text"
     required
     name="fullName"
     id="fullName"
     value={fullName}
     onChange={(e) => setFullName(e.target.value)}
    />

    <label htmlFor="email">Email Address</label>
    <input
     type="email"
     required
     name="email"
     id="email"
     value={email}
     onChange={(e) => setEmail(e.target.value)}
    />

    <label htmlFor="phoneNumber">Phone Number</label>
    <input
     type="tel"
     required
     name="phoneNumber"
     id="phoneNumber"
     value={phoneNumber}
     onChange={(e) => setPhoneNumber(e.target.value)}
    />

    <label htmlFor="skills">Skills</label>
    <input
     required
     name="skills"
     id="skills"
     value={skills}
     onChange={(e) => setSkills(e.target.value)}
    />

    <label htmlFor="educationHistory">Education History</label>
    <input
     required
     name="educationHistory"
     id="educationHistory"
     value={educationHistory}
     onChange={(e) => setEducationHistory(e.target.value)}
    />

    <label htmlFor="workExperience">Work Experience</label>
    <input
     required
     name="workExperience"
     id="workExperience"
     value={workExperience}
     onChange={(e) => setWorkExperience(e.target.value)}
    />

    <label htmlFor="photo">Upload Your Headshot Image</label>
    <input
     type="file"
     name="photo"
     required
     id="photo"
     accept="image/x-png,image/jpeg"
     onChange={(e) => setHeadshot(e.target.files[0])}
    />

    <h3>Companies you've worked at</h3>

    {/*--- other UI tags --- */}
    {companyInfo.map((company, index) => (
     <div className="nestedContainer" key={index}>
      <div className="companies">
       <label htmlFor="name">Company Name</label>
       <input
        type="text"
        name="name"
        required
        onChange={(e) => handleUpdateCompany(e, index)}
       />
      </div>
      <div className="companies">
       <label htmlFor="position">Position Held</label>
       <input
        type="text"
        name="position"
        required
        onChange={(e) => handleUpdateCompany(e, index)}
       />
      </div>

      <div className="btn__group">
       {companyInfo.length - 1 === index && companyInfo.length < 4 && (
        <button id="addBtn" onClick={handleAddCompany}>
         Add
        </button>
       )}
       {companyInfo.length > 1 && (
        <button id="deleteBtn" onClick={() => handleRemoveCompany(index)}>
         Delete
        </button>
       )}
      </div>
     </div>
    ))}
    <button>CREATE RESUME</button>
   </form>
  </div>
 );
};

export default Home;
Make sure the server is still running, navigate into the fronted on the terminal and run the application using the following command.
npm start
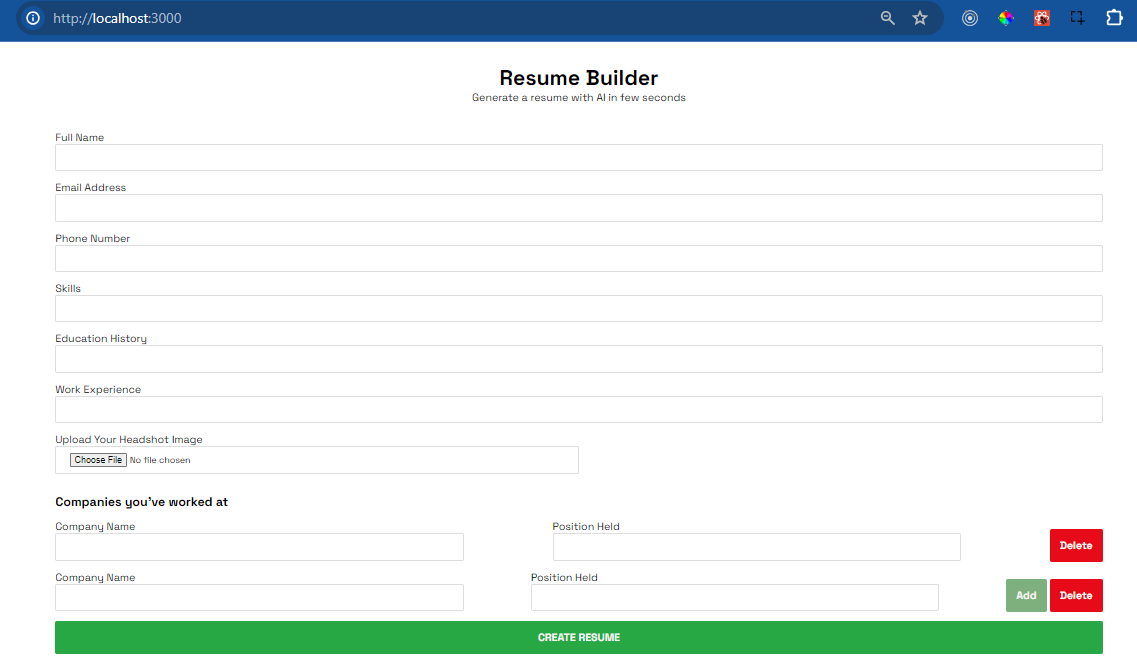
As you can see in the image we obtained after running the application, the interface presents a user-friendly form for building resumes. It prompts users to input essential personal details such as their full name, email address, and phone number. Additionally, users can specify their skills, education history, and work experience.
Furthermore, the application allows users to upload a headshot image for inclusion in the resume. Notably, users can also input details about the companies they've worked for, including company names and positions held. The interface dynamically adjusts to accommodate multiple entries for work experience, enabling users to add or remove company information as needed.
Upon completion of the form, users can generate their resume by clicking the "CREATE RESUME" button. The application then processes the entered data, providing users with a streamlined experience in crafting professional resumes tailored to their unique backgrounds and qualifications.
Resume page
In the Resume component, users are presented with a streamlined interface for viewing and potentially printing their generated resumes. This React component is designed to handle the rendering of resume content based on the provided result object. If the result object is empty, indicating that no resume data is available, the component renders an ErrorPage component to alert users to provide their details. Otherwise, users are presented with a "Print Page" button to initiate the printing process. Copy the code below into the Resume.js file.
import React from "react";
import ErrorPage from "./ErrorPage";

const Resume = ({ result }) => {
    if (JSON.stringify(result) === "{}") {
        return <ErrorPage />;
    }
    const handlePrint = () => alert("Print Successful!");
    return (
        <>
            <button onClick={handlePrint}>Print Page</button>
            <main className='container'>
                <p>Hello!</p>
            </main>
        </>
    );
};
Submitting images via forms in Node.js
This guide will walk you through submitting form data, including images, to a Node.js server. To handle image uploads, we'll set up Multer, a middleware for handling multipart/form-data, ensuring seamless handling of image submissions in your Node.js application.
First, let's set Multer
While on the backend, run the following code to install Multer
npm install multer
Next, import the Multer and the Node.js path packages into the index.js file.
const { Configuration, OpenAIApi } = require("openai");
const express = require("express");
const multer = require("multer");
const path = require("path");
const cors = require("cors");
const fs = require("fs");
const app = express();
const PORT = 4000;

app.use(express.urlencoded({ extended: true }));
app.use("/uploads", express.static("uploads"));
app.use(express.json());
app.use(cors());
app.get("/api", (req, res) => {
    res.json({
        message: "Hello world",
    });
});
app.listen(PORT, () => {
    console.log(`Server listening on ${PORT}`);
});
To configure Multer, add the following code to the index.js file
app.use("/uploads", express.static("uploads"));

const storage = multer.diskStorage({
    destination: (req, file, cb) => {
        cb(null, "uploads");
    },
    filename: (req, file, cb) => {
        cb(null, Date.now() + path.extname(file.originalname));
    },
});
const upload = multer({
    storage: storage,
    limits: { fileSize: 1024 * 1024 * 5 },
});
From the code snippet above:
app.use("/uploads", express.static("uploads")): This line configures Express to serve static files from the "uploads" directory when requests are made to the "/uploads" endpoint.const storage = multer.diskStorage({ ... }): Here, Multer is configured with disk storage, specifying where to store uploaded files and how to name them.destination: Specifies the directory where uploaded files will be stored. In this case, it's set to the "uploads" directory.filename: Defines how uploaded files should be named. In this example, the file is given a unique name based on the current timestamp and the original file extension.
const upload = multer({ ... }): Multer middleware is initialized with the configured storage options and file size limits.storage: Specifies the storage configuration defined earlier.limits: Sets a maximum file size limit for uploaded files, in this case, 5 MB.
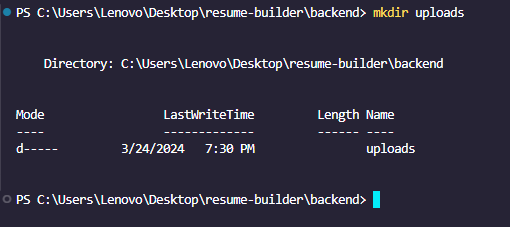
Create an uploads folder in the backend by running the following command, this folder is where images will be saved.
mkdir uploads
Uploading images to the Node.js server
Here we first add a route that accepts all the form inputs from the React app.
app.post('/resume/create', upload.single('headshotImage'), (req, res) => {
    const {
        fullName,
        email,
        phoneNumber,
        skills,
        educationHistory,
        workExperience,
        companyInfo,
    } = req.body;

    // Log form data received from the client
    console.log(req.body);

    // Respond to the client with a success message
    res.json({
        message: "Request successful!",
        data: {},
    });
});
The upload.single("headshotImage") function adds the image uploaded via the form to the uploads folder.
Second, we need to update the handleFormSubmit function within the Home.js component to submit the form data to the Node.js server.
 const handleFormSubmit = (e) => {
        e.preventDefault();
        const formData = new FormData();
        formData.append("headshot", headshot, headshot.name);
        formData.append("fullName", fullName);
        formData.append("educationHistory", educationHistory);
        formData.append("workExperience", workExperience);
        formData.append("companyInfo", companyInfo);
        formData.append("workHistory", JSON.stringify(companyInfo));
        axios
            .post("http://localhost:4000/resume/create", formData, {})
            .then((res) => {
                if (res.data.message) {
                    console.log(res.data.data);
                    history.push("/resume");
                }
            })
            .catch((err) => console.error(err));
        setLoading(true);
    };
Integrating OpenAI API in Node.js
In this section, we'll demonstrate how to interact with the OpenAI API within a Node.js server. We'll use the user's data to request profile summaries, job descriptions, and descriptions of achievements or activities completed at previous organizations from the API. This process will involve sending the user's information to the OpenAI API and handling the generated responses accordingly.
Start by installing the OpenAI API Node.js library by running the code below.
npm install openai
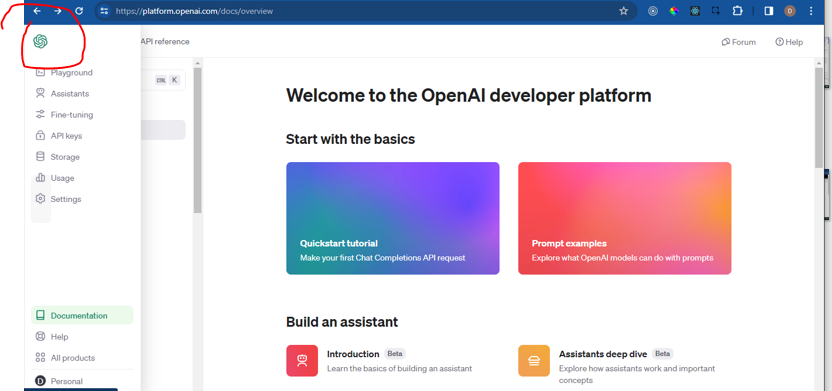
Next, you need to log in or create an OpenAI account.
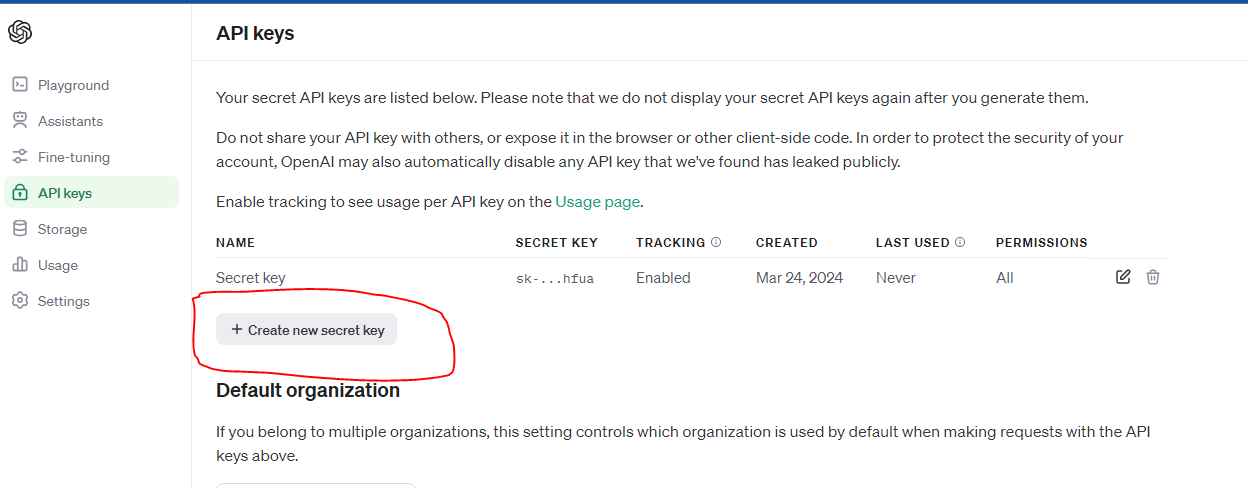
Click Personal on the navigation bar and select View API keys from the menu bar to create a new secret key.
Click on the OpenAI logo on the left sidebar to display API keys and click on the API keys.
Click on Create New Secret Keys to generate API keys and copy and save them somewhere we will be using shortly.
Copy the code below into the index.js file to configure the API
const { Configuration, OpenAIApi } = require("openai");

const configuration = new Configuration({
    apiKey: "<YOUR_API_KEY>",
});
const openai = new OpenAIApi(configuration);
Replace <YOUR_API_KEY> with the API keys you just copied
Now we need to develop a function capable of receiving a text input (prompt) as an argument and providing an AI-generated response.
const GPTFunction = async (text) => {
    const response = await openai.createCompletion({
        model: "text-davinci-003",
        prompt: text,
        temperature: 0.6,
        max_tokens: 250,
        top_p: 1,
        frequency_penalty: 1,
        presence_penalty: 1,
    });
    return response.data.choices[0].text;
};
The code above defines an asynchronous function GPTFunction that utilizes the OpenAI API to generate text completions based on the provided input prompt. It specifies parameters such as the AI model to use (text-davinci-003), temperature, maximum tokens, and penalties to control the generation process.
Update the /resume/create route by copying the code below
app.post('/resume/create', upload.single('headshotImage'), (req, res) => {
    const {
        fullName,
        email,
        phoneNumber,
        skills,
        educationHistory,
        companyInfo,
        workExperience,
    } = req.body;
    const workArray = JSON.parse(workHistory); //an array
    //👇🏻 group the values into an object
    const newEntry = {
        id: generateID(),
        fullName,
        email,
        phoneNumber,
        image_url: `http://localhost:4000/uploads/${req.file.filename}`,
        educationHistory,
        skills,
        workExperience: workArray,
        companyInfo,
    };
});
Next, we need to create the prompts we need to pass into the GPTFunction.
//The job description prompt
const prompt1 = `I am writing a resume, my details are \n name: ${fullName} \n role: ${currentPosition} (${currentLength} years). \n I write in the technolegies: ${currentTechnologies}. Can you write a 100 words description for the top of the resume(first person writing)?`;
// The job responsibilities prompt
const prompt2 = `I am writing a resume, my details are \n name: ${fullName} \n role: ${currentPosition} (${currentLength} years). \n I write in the technolegies: ${currentTechnologies}. Can you write 10 points for a resume on what I am good at?`;
// The job achievements prompt
const prompt3 = `I am writing a resume, my details are \n name: ${fullName} \n role: ${currentPosition} (${currentLength} years). \n During my years I worked at ${
    workArray.length
} companies. ${remainderText()} \n Can you write me 50 words for each company seperated in numbers of my succession in the company (in first person)?`;

// generate a GPT-3 result
const objective = await GPTFunction(prompt1);
const keypoints = await GPTFunction(prompt2);
const jobResponsibilities = await GPTFunction(prompt3);
//put them into an object
const chatgptData = { objective, keypoints, jobResponsibilities };
//log the result
console.log(chatgptData);
From the code snippet above:
The
remainderTextfunction loops through the array of work history and returns a string data type of all work experiences.Then, there are three prompts with instructions on what is needed from the GPT-3 API.
Next, you store the results in an object and log them to the console.
Finally, we need to return both the data that the users submitted and the outcome that the AI generated. As demonstrated below, you may alternatively build an array to represent the database and store the results.
let database = [];

app.post("/resume/create", upload.single("headshotImage"), async (req, res) => {
    //...other code statements
    const data = { ...newEntry, ...chatgptData };
    database.push(data);
    res.json({
        message: "Request successful!",
        data,
    });
});
Displaying the response from the OpenAI API
In this segment, I will walk you through presenting the outcomes produced by the OpenAI API in a clear and printable manner on a webpage.
In the App.js create a React state, which will hold the result sent from the Node.js server. Do this by updating the App.js file with the code below:
import React, { useState } from "react";
import { BrowserRouter, Routes, Route } from "react-router-dom";
import Home from "./components/Home";
import Resume from "./components/Resume";

const App = () => {
 const [result, setResult] = useState({});
 return (
  <div>
   <BrowserRouter>
    <Routes>
     <Route path="/" element={<Home setResult={setResult} />} />
     <Route path="/resume" element={<Resume result={result} />} />
    </Routes>
   </BrowserRouter>
  </div>
 );
};
export default App;
In the provided code snippet, the setResult function is passed as a prop into the Home component, allowing it to update the result state once the form is submitted successfully. This mechanism facilitates real-time communication between the Home component, where the form is located, and the parent component, App. By invoking setResult within the Home component upon successful form submission, the latest result data retrieved from the server can be propagated up to the App component and subsequently passed down to the Resume component for display.
Update the Resume component with the code below demonstrated below to provide a preview of the outcome within the React application.
import React, { useRef } from "react";
import ErrorPage from "./ErrorPage";
import { useReactToPrint } from "react-to-print";

const Resume = ({ result }) => {
 const componentRef = useRef();

 const handlePrint = useReactToPrint({
  content: () => componentRef.current,
  documentTitle: `${result.fullName} Resume`,
  onAfterPrint: () => alert("Print Successful!"),
 });

 if (JSON.stringify(result) === "{}") {
  return <ErrorPage />;
 }

 const replaceWithBr = (string) => {
  return string.replace(/\n/g, "<br />");
 };

 return (
  <>
   <button onClick={handlePrint}>Print Page</button>
   <main className="container" ref={componentRef}>
    <header className="header">
     <div>
      <h1>{result.fullName}</h1>
      <p className="resumeTitle headerTitle">
       {result.currentPosition} ({result.currentTechnologies})
      </p>
      <p className="resumeTitle">
       {result.currentLength}year(s) work experience
      </p>
     </div>
     <div>
      <img
       src={result.image_url}
       alt={result.fullName}
       className="resumeImage"
      />
     </div>
    </header>
    <div className="resumeBody">
     <div>
      <h2 className="resumeBodyTitle">PROFILE SUMMARY</h2>
      <p
       dangerouslySetInnerHTML={{
        __html: replaceWithBr(result.objective),
       }}
       className="resumeBodyContent"
      />
     </div>
     <div>
      <h2 className="resumeBodyTitle">WORK HISTORY</h2>
      {result.workHistory.map((work) => (
       <p className="resumeBodyContent" key={work.name}>
        <span style={{ fontWeight: "bold" }}>{work.name}</span> -{" "}
        {work.position}
       </p>
      ))}
     </div>
     <div>
      <h2 className="resumeBodyTitle">JOB PROFILE</h2>
      <p
       dangerouslySetInnerHTML={{
        __html: replaceWithBr(result.jobResponsibilities),
       }}
       className="resumeBodyContent"
      />
     </div>
     <div>
      <h2 className="resumeBodyTitle">JOB RESPONSIBILITIES</h2>
      <p
       dangerouslySetInnerHTML={{
        __html: replaceWithBr(result.keypoints),
       }}
       className="resumeBodyContent"
      />
     </div>
    </div>
   </main>
  </>
 );
};

export default Resume;
printing React pages using the React-to-print package
In this section, I will guide you on how to implement printing functionality in your React applications using the React-to-print package. This package facilitates the printing of specific components or pages directly from the browser, enhancing the user experience by providing a convenient method to generate physical copies of React pages.
React-to-print is a simple JavaScript package that enables you to print the content of a React component without tampering with the component CSS styles.
Navigate into the frontend folder and run the following code to install the package.
npm install react-to-print
Import the library within the Resume.js file and add the useRef hook.
import { useReactToPrint } from "react-to-print";
import React, { useRef } from "react";
Update the Resume.js file with the code below:
import React, { useRef } from "react";
import ErrorPage from "./ErrorPage";
import { useReactToPrint } from "react-to-print";

const Resume = ({ result }) => {
 const componentRef = useRef();

 const handlePrint = useReactToPrint({
  content: () => componentRef.current,
  documentTitle: `${result.fullName} Resume`,
  onAfterPrint: () => alert("Print Successful!"),
 });

 if (JSON.stringify(result) === "{}") {
  return <ErrorPage />;
 }

 const replaceWithBr = (string) => {
  return string.replace(/\n/g, "<br />");
 };

 return (
  <>
   <button onClick={handlePrint}>Print Page</button>
   <main className="container" ref={componentRef}>
    <header className="header">
     <div>
      <h1>{result.fullName}</h1>
      <p className="resumeTitle headerTitle">
       {result.currentPosition} ({result.currentTechnologies})
      </p>
      <p className="resumeTitle">
       {result.currentLength}year(s) work experience
      </p>
     </div>
     <div>
      <img
       src={result.image_url}
       alt={result.fullName}
       className="resumeImage"
      />
     </div>
    </header>
    <div className="resumeBody">
     <div>
      <h2 className="resumeBodyTitle">PROFILE SUMMARY</h2>
      <p
       dangerouslySetInnerHTML={{
        __html: replaceWithBr(result.objective),
       }}
       className="resumeBodyContent"
      />
     </div>
     <div>
      <h2 className="resumeBodyTitle">WORK HISTORY</h2>
      {result.workHistory.map((work) => (
       <p className="resumeBodyContent" key={work.name}>
        <span style={{ fontWeight: "bold" }}>{work.name}</span> -{" "}
        {work.position}
       </p>
      ))}
     </div>
     <div>
      <h2 className="resumeBodyTitle">JOB PROFILE</h2>
      <p
       dangerouslySetInnerHTML={{
        __html: replaceWithBr(result.jobResponsibilities),
       }}
       className="resumeBodyContent"
      />
     </div>
     <div>
      <h2 className="resumeBodyTitle">JOB RESPONSIBILITIES</h2>
      <p
       dangerouslySetInnerHTML={{
        __html: replaceWithBr(result.keypoints),
       }}
       className="resumeBodyContent"
      />
     </div>
    </div>
   </main>
  </>
 );
};

export default Resume;
The handlePrint function prints the elements within the componentRef - main tag, sets the document's name to the user's full name and runs the alert function when a user prints the form.
Conclusion
In conclusion, this step-by-step guide has demonstrated the development of a powerful resume builder application using OpenAI for AI-generated content, Node.js for server-side logic, and React for the frontend interface. By integrating these technologies, users can easily create professional resumes with dynamically generated content, enhancing their job application process. This project showcases the seamless integration of AI capabilities with web development, empowering users to craft compelling resumes efficiently.


